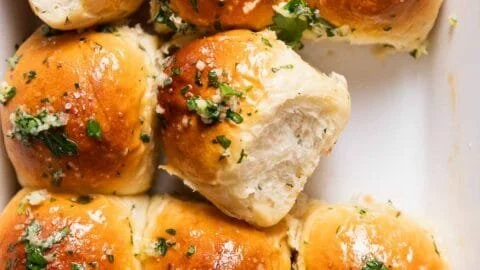
Garlic Bread Rolls are a delightful and comforting addition to any meal. They are fluffy, buttery, and bursting with garlicky goodness. Imagine biting into a warm, soft roll that offers a perfect balance of savory garlic and the fresh aroma of parsley. These rolls are an ideal side dish for pasta, soups, or just enjoyed on their own with a bit of extra garlic butter.
Why Make This Garlic Bread Rolls
These Garlic Bread Rolls stand out for their irresistible aroma and taste. They are easy to make and require simple ingredients you probably already have in your pantry. Perfect for family dinners or entertaining guests, these rolls elevate any meal. Making these from scratch not only fills your home with a warm, inviting scent but also creates a fun homemade aspect to your table. Plus, who can resist a freshly baked roll slathered with garlic butter?
How to Make Garlic Bread Rolls
Making Garlic Bread Rolls is simple and fun. Start by preparing your dough, allowing it to rise until fluffy, and then baking it to golden perfection. Follow the steps closely for best results, and remember, patience is key when waiting for the dough to rise. The beauty of this recipe is in how easily you can whip up a batch while enjoying the satisfaction of home baking.
Ingredients:
- 4 1/2 tablespoons unsalted butter
- 2 tablespoons minced garlic
- 3 1/2 cups + 1 tablespoon all-purpose flour (See notes below for measuring)
- 3 tablespoons chopped fresh parsley
- 1 tablespoon granulated sugar
- 2 1/4 teaspoons instant yeast
- 1 teaspoon fine sea salt
- 1 cup whole or 2% milk (warmed to 110°F)
- 1 large egg (room temperature)
- 1 beaten egg, for brushing the tops
- 2 tablespoons unsalted butter
- 1 tablespoon minced garlic
- 1 tablespoon chopped fresh parsley
- Flaky sea salt (for finishing)
Directions:
- Lightly butter the bottom and sides of a 9×13 pan and set it aside.
- In a small pot, melt the 4 1/2 tablespoons of unsalted butter and add the minced garlic. Cook for 1-2 minutes or until the garlic is fragrant. Take off the heat and cool while you measure the other ingredients.
- In a stand mixing bowl, combine the flour, parsley, sugar, yeast, and salt. Then add the warmed milk, egg, and the cooled garlic butter mixture. Knead on low speed with a dough hook until the dough looks smooth and feels soft and tacky, about 10-12 minutes. If the dough is too sticky, add one tablespoon of flour at a time until you have a workable dough.
- Cut the kneaded dough into 12 equal portions (use a scale for accuracy—67 grams each). Shape each piece into a smooth ball with your hand. Pinch the bottom of the roll where the seam comes together to keep it tight. Place the shaped dough balls into the prepared baking pan.
- Cover the top with plastic wrap or a clean kitchen towel and place in a warm area. Let them rise until doubled in size, about 1-2 hours. Watch the video below for visual aid!
- Preheat the oven to 350°F (180°C).
- Brush the tops of the rolls with the beaten egg wash. Bake for 20-30 minutes, or until the tops are golden brown.
- While the rolls are baking, make the garlic butter. Melt 2 tablespoons of butter in a pot and add the minced garlic. Cook for 1-2 minutes until the garlic is fragrant. Remove from heat and stir in the parsley.
- When the rolls come out of the oven, immediately brush them with the garlic butter. Sprinkle with flaky sea salt if desired, and serve warm!
Nutritional Information
Per Roll:
- Calories: 150
- Total Fat: 6g
- Saturated Fat: 3.5g
- Carbohydrates: 19g
- Dietary Fiber: 0.5g
- Sugars: 0.5g
- Protein: 3g
- Cholesterol: 30mg
- Sodium: 180mg
How to Serve Garlic Bread Rolls
Garlic Bread Rolls are versatile. Serve them alongside a hot bowl of soup or pasta for a complete meal, or on their own as a delightful snack. You can also pair them with a fresh salad for a light lunch. Don’t forget to offer extra garlic butter on the side for those who love a good slather.
How to Store Garlic Bread Rolls
Once baked, store your rolls in a sealed container at room temperature for up to 2 days. If you want to keep them fresh longer, freeze them. Simply place the cooled rolls in a zip-top bag, removing as much air as possible, and freeze for up to a month. To reheat, thaw in the fridge overnight, then warm in the oven at 350°F (180°C) until heated through.
Expert Tips for Perfect Garlic Bread Rolls
- Measure Flour Correctly: For best results, spoon flour into a measuring cup and level it off with a knife.
- Don’t Rush the Rise: Give your dough enough time to rise; a warm, draft-free spot works best.
- Egg Wash: Brushing the tops with beaten egg gives your rolls a beautiful, shiny finish.
Delicious Variations
- Cheesy Garlic Rolls: Add shredded mozzarella or Parmesan cheese to the dough for a cheesy twist.
- Herbed Rolls: Incorporate different herbs, like basil or oregano, into the dough for varied flavors.
- Spicy Garlic Rolls: Include a pinch of red pepper flakes in the garlic butter for a hint of heat.
Frequently Asked Questions
Can I use active dry yeast instead of instant yeast?
Yes, but you’ll need to activate it in warm water first. Mix the yeast with warm water and a bit of sugar, then wait until it becomes bubbly before adding it to the dough.
Can I make the dough ahead of time?
Absolutely! You can prepare the dough and refrigerate it overnight. Just let it come to room temperature and rise before shaping.
How can I make these rolls gluten-free?
You can use a 1:1 gluten-free flour blend as a substitute for all-purpose flour. Make sure your yeast is also gluten-free.
Conclusion
These Garlic Bread Rolls are more than just a side dish; they bring warmth and joy to any meal. They’re easy to make, delicious, and sure to impress family and friends. So, don’t hesitate! Try making them at home, and enjoy the heavenly aroma filling your kitchen. Share your experiences, tips, or any creative variations you come up with in the comments below! Happy baking!